Connect your systems with API keys and webhooks
Create API keys so your own software can place and track orders, and webhooks so it hears about new orders and status changes.
On this page
The Developers page lets your own software (an ERP, a web shop, a script) work with your courier without anyone signing in. API keys and webhooks act for your whole company, so only the primary contact can manage them; everyone else sees the Docs tab.
Open your account menu (your initials) and pick Developers.
Create an API key
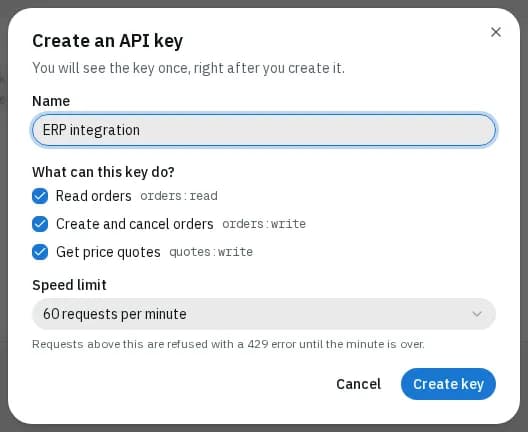
- On the API keys tab, click Create key.
- Give it a Name, for example the system that will use it.
- Under What can this key do?, tick Read orders, Create and cancel orders and/or Get price quotes.
- Pick a Speed limit (30, 60, 120, 600 or 3000 requests per minute; 60 is the default). Requests above it are refused until the minute is over.
- Click Create key, then copy the key and store it somewhere safe.
A key acts as one of your contacts (the Acts as column) and can do no more than that contact can in the portal. Contact on a key switches it to another contact, for example when a colleague leaves. Your courier's plan must include API access.
The list shows each key's start, what it can do, who it Acts as, when it was Last used and its status (Active, Expiring, Expired or Revoked).
- Rotate gives you a replacement key with the same permissions. The old key keeps working for 24 hours, so you can switch over without downtime.
- Revoke stops a key at once; anything using it is refused. This can't be undone.
Add a webhook
A webhook is a URL on your server that the portal calls when something happens, so your system doesn't have to keep asking.
- On the Webhooks tab, click Add endpoint.
- Enter the full URL, like
https://example.com/hooks. - Under Send me: orders, tick the order events you want: Order created, Status changed, ETA changed, Arriving soon, Attempt failed (with the reason), Delivered (with the proof of delivery) and Cancelled. All the order events start ticked. Send me: invoices (Invoice issued, Invoice paid, Invoice overdue, Invoice voided) only appears if you can view invoices.
- Click Add endpoint, then copy the signing secret shown. It is shown only once.
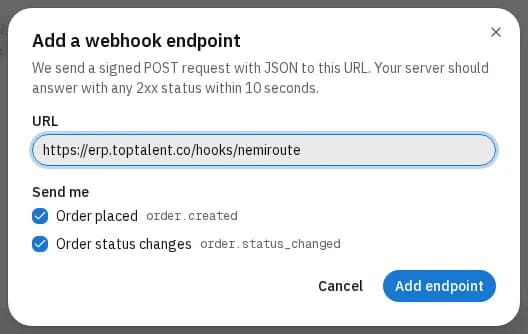
Your server should answer with any 2xx status within 10 seconds. Every call is signed: check the NemiRoute-Signature header with the secret.
Payload versions
Each endpoint shows its payload version. New endpoints get Payload v2: the full order (tracking link, ETA, failure reason, proof and document links) or the invoice. Older endpoints show Payload v1 (legacy): only Order created and Status changed, with the short order block they always had. Update your receiver, then click Switch to v2.
Test and look after an endpoint
- Send test event sends a sample call and opens the Delivery log.
- Delivery log shows the last 50 attempts, each as Delivered, Waiting, Retrying or Gave up. Failed calls are retried up to 5 times, the last after 6 hours. Replay sends a call again.
- The On / Off switch pauses an endpoint without removing it.
- New secret creates a new signing secret. For 24 hours every call carries two
v1=signatures in theNemiRoute-Signatureheader, one per secret. Accept the call when anyv1value matches. - Remove stops all calls to that URL.
If your courier's plan doesn't include API access, you can't add an endpoint or change its URL, events or version. Endpoints you already have keep delivering.
Read the docs
The Docs tab explains how to authenticate, get a price, place, track, list or cancel orders, download labels and proofs of delivery, manage your address book, the limits and errors, and how to check webhook signatures.
Related articles
- How-toImport orders from a spreadsheetPlace many orders at once from a CSV or Excel file, match its columns, fix rows with problems and undo an import if needed.
- How-toInvite colleagues and set what they can doGive people at your company their own portal login and choose whether they can place orders, see or pay invoices, manage addresses and see colleagues.
- Page guideDevelopers (API keys and webhooks)The Developers page of the portal: the API keys, Webhooks and Docs tabs, every field of the key and endpoint forms, and what each button changes.
Still stuck?
Ask your courier company: they can see your account. Or tell us what you were trying to do.