Create an order
Book a pickup and delivery for a customer, compare services and see the live price before you save.
Watch: A multi-stop job
3:08One pickup, several drops and a return leg on one order: how to enter it, how it is priced and how the driver works through it.
Watch: Create an order
1:43Pick the customer, the route and what is moved, compare the services by price and delivery time, and create the order.
On this page
Use the order form when a customer phones or emails a request. Dispatchers, operations managers and admins can create orders. The price is calculated while you fill in the form, so you can tell the customer what it costs before you save.
Fill in the order
Got the order by email, text or WhatsApp? Paste it into Ask AI to fill this order at the top and select Draft with AI, check What the AI understood and Still needed, then Fill the order form and finish below: sections the AI filled show Filled by AI until you change them (see the page guide). Only when AI is on for your company.
- Open Orders and click Create order.
- Under Customer, pick the Customer account. The contact, the default delivery address and what the customer booked last time are filled in for you. Click Reset in the grey note to undo the last-order prefill.
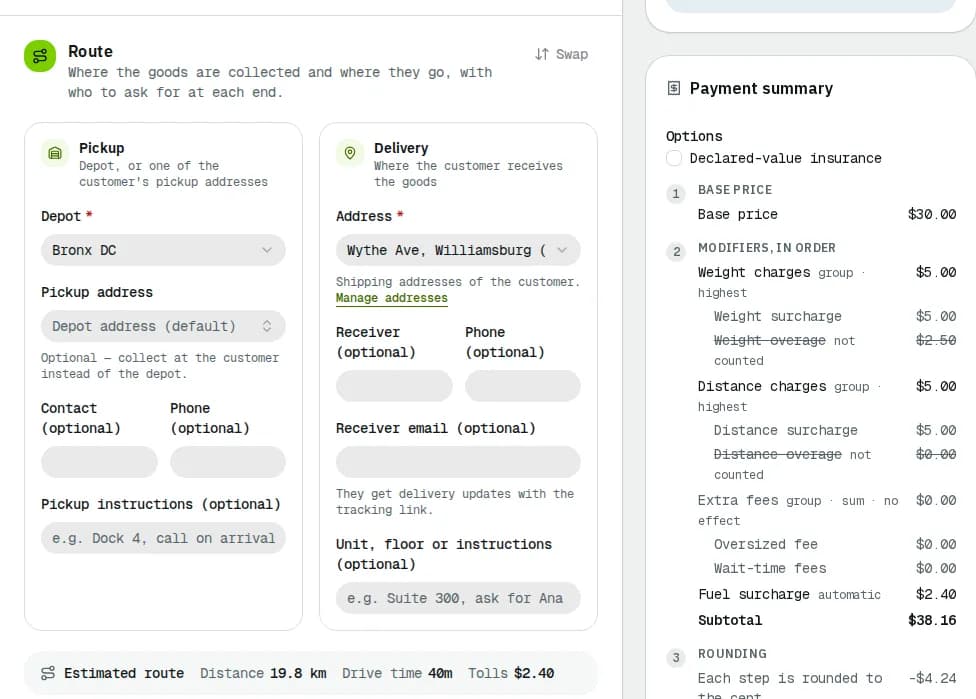
- Under Route, check the Depot the goods leave from. To collect at the customer instead, pick a Pickup address. Under Delivery, choose the Address and, if needed, a Receiver, phone and Receiver email (they get delivery updates with the tracking link).
- Under What's being moved, pick a package type to fill its size and weight, then set Quantity and Weight each (the weight of one package, in kg or lb as your company is set up). Click Add package for more lines.
- Under Schedule & service, set the Pickup day and time and pick a Service type. Each service card shows its price and when it delivers. The Delivery day follows the service's promise until you change it.
- Under Order details, choose How did this order come in? (required), add a Reference number and Priority, and tick Receiver must sign or Photo as proof of delivery when the customer asks for proof.
- If your company uses Custom fields, fill them in under Custom fields. Fields marked
*are required, except on a draft.
Check the price
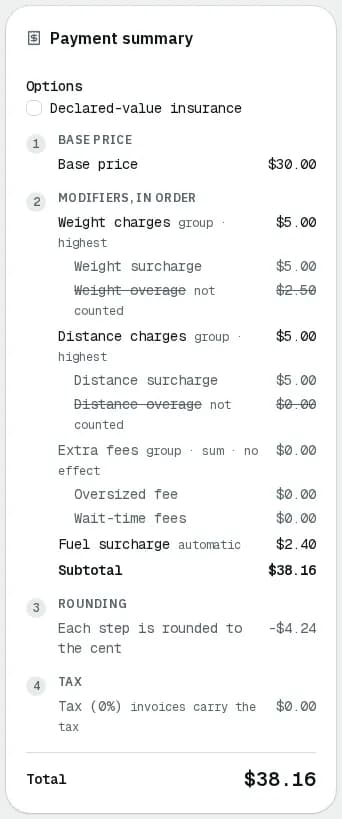
The Payment summary on the right recalculates as you change the route, packages or service. It shows the Base price, the Modifiers, in order, the Subtotal, rounding and tax, then the total.
- Under Options, tick or untick optional surcharges such as insurance. Options marked on by default are already included.
- When the panel says Out of date, the inputs have changed since the last calculation; it updates after a moment.
- Order preview sums up the customer, route, packages, Distance (with the drive time) and estimated charge.
Dispatch now or later (optional)
In Dispatch (optional) you can Assign a driver now, or tick Offer it to the driver network when your company uses it. Leave it empty to plan the order on a route later. Set the total by hand (optional) replaces the calculated price and is logged as a price override.
Save
- Click Create order (or press
Ctrl Enter) to create it as Pending. The order page opens. - Click Save draft to keep it as a Draft when details are missing. A draft only needs the customer; confirm it later from the order page with Confirm order.
One driver collecting or delivering at several places? Add Extra stops under Route: see Book a multi-stop job.
To repeat an earlier order with new dates, open it and use Duplicate order instead (see Work on an order).
Related articles
- How-toImport orders from a spreadsheetCreate many orders at once from a CSV or Excel file, fix the rows that have problems, or paste one row into a new order.
- How-toWork on an orderAssign a driver, change the status, edit the order, add notes and files, share tracking, print documents, cancel or complete it.
- How-toUse the address bookLook up saved pickup and delivery addresses, check their pricing zone, and find addresses that need fixing before orders can use them.
- How-toAdd custom fields to customers and ordersCreate your own extra fields, such as a PO number or a department, choose their type and who sees them, and see where the values show up.
- ConceptMulti-stop jobs explainedHow a job with extra pickups, drops and a return works from booking to completion: stop types, the order they are worked in, price, distance, proof, failures and who sees what.
- TroubleshootingOrder and dispatch error messagesWhat the red messages mean when you save an order, work a stop, change a status or run a route, and how to fix each one.
- Page guideCreate orderEvery section and field of the Create order form: customer, route and extra stops, packages, schedule and service, order details, custom fields, dispatch, and the live price.
Still stuck?
Tell us what you were trying to do. A person reads every message.