Complete a delivery
Take an order from accept to delivered: navigate, arrive, collect proof (signature, photo, barcode, cash) and confirm.
On this page
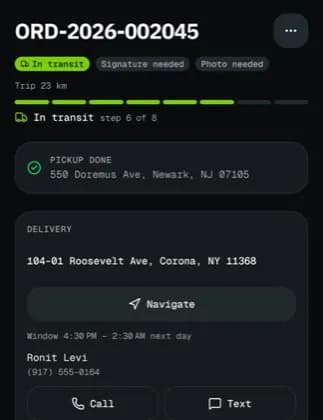
Every order moves step by step from pickup to delivery. The big button at the bottom of the order always shows your next step, so you never have to look for it.
Find your next order
- Home shows your Next order or Current order with the pickup and delivery addresses and one action button.
- The Orders tab lists all orders: In progress, To accept, and Cash in hand when you carry cash. Use Active, Completed and Cancelled to switch lists, or search by number, address or barcode.
- Tap an order to open it: the progress bar, the Pickup and Delivery stops, Packages, Proof and History.
Go through the steps
- Tap Accept order. (To refuse it, tap ⋯ > Decline order, pick a reason and tap Decline order.)
- Tap Start pickup, then Navigate on the pickup stop to open your maps app.
- At the pickup, tap Arrive at pickup, then Complete pickup and add the proof it asks for.
- Tap Start delivery and drive to the delivery address. Call and Text reach the recipient when your company allows it.
- Tap Arrive at delivery, then Complete delivery (see below).
The GPS check
Arrive and complete steps open a screen that checks you are at the address; you confirm with the same button at the bottom. The location card shows You are at the delivery address or You are 350 m away, move within 200 m. Your company sets how close you must be (200 m unless it changed it), and some companies let you continue from further away if you say why in Why are you here? (required). Each stop of a multi-stop job is checked against its own address. Tap Check again after you move. If location is off, tap Allow location (see Location and battery settings).
Collect the proof
The Complete delivery screen starts with a Checklist of what is still needed. Only what your company asks for at this stop appears. Tap a row to jump to it.
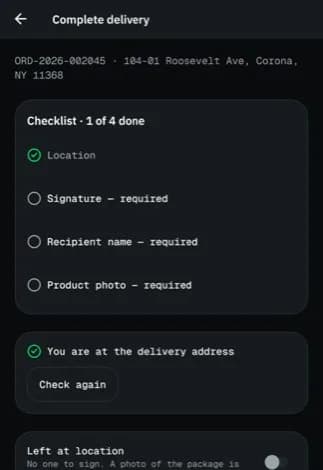
- Signature: ask the recipient to sign inside the box. Clear starts again.
- Recipient name: type the name of the person who signed, and pick a Relationship to recipient.
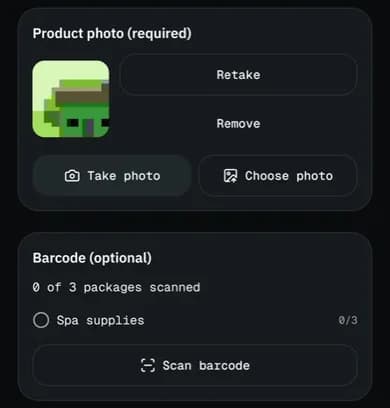
- Product photo: tap Take photo. Choose photo appears only if your company allows photos from the gallery. You can add up to 4 photos; each one has Retake, Replace from library and Remove.
- Barcode: tap Scan barcode and point the camera at the label. If it will not scan, tap Enter code manually, type it and tap Verify code.
- ID check (age-restricted goods): look at a photo ID, pick its type and type the Birth date (YYYY-MM-DD). If the person is too young the app says do not hand it over. Delivery PIN: type the code the recipient has on their tracking page.
- Packages handed over: with several packages, all start as delivered; tap Mark a problem and mark any that was Refused, Damaged or Missing. The order shows as delivered (partial).
- Temperature reading: cold-chain goods ask for the reading in °C.
- Cash: on cash-on-delivery orders, COLLECT CASH shows the amount. Enter what you got in Cash collected. If it differs, pick why: Short paid, Overpaid, Customer refused or Other.
- Add a Note (optional) and tap Complete delivery.
Related articles
- How-toReport a failed deliveryMark a delivery attempt as failed with a reason and photos, or send a problem report, and bring the package back to the depot.
- How-toWork without signalWhat the driver app does offline, how saved actions sync later, and how to retry or discard one.
- How-toLocation and battery settingsWhich location permission to give, when NemiRoute shares your location, and how to keep Android from stopping it.
- Page guideProof of delivery screenEvery part of the arrive and complete screens in the driver app: the location check, the checklist, left at location, signature, recipient name, ID check, delivery PIN, photos, barcode, temperature, packages handed over, cash and uploads.
- Page guideOrder screenEverything on one order in the driver app: the progress bar, the Pickup and Delivery stops with Navigate, Call and Text, stops, cash, packages, notes, pay, proof, history, the next-step button and the Order actions menu (report, contact, edit, transfer, decline).
- How-toCollect cash on deliveryTake the cash a customer owes at the door, enter what you really collected, say why when it differs, and see the cash you still carry.
Still stuck?
Ask your courier company: they can see your account. Or tell us what you were trying to do.